Cheesecake Fruit Roll-Ups
I remember a sweltering afternoon last summer, when I was absolutely craving something sweet and refreshing, but also something that felt a little indulgent. That’s when the idea for these delightful Cheesecake Fruit Roll-Ups popped into my head – a perfect blend of creamy, sweet, and wonderfully fresh!
It brought me right back to childhood, when my mom would surprise us with little fruit salads, but this felt like a grown-up, fun twist on that memory. I wanted something easy to eat, handheld, and packed with all the good things.
Trust me, once you whip these up, you’ll be wondering where they’ve been all your life. They’re a fantastic little treat, much like a lighter version of something you might find at a brunch spread, maybe even alongside some chocolate strawberry bruschetta.
What You Need to Make This Recipe
The heart of these amazing Cheesecake Fruit Roll-Ups truly lies in a few simple things that come together to create magic. You’ll definitely want to start with a good quality cream cheese, softened perfectly, because that’s what gives us that irresistible, creamy tang. Then, the fresh fruit – whatever’s in season and looks beautiful at the market – truly makes them pop, offering bursts of natural sweetness and vibrant color, almost like the fruity notes you find in a decadent peanut butter and jelly cheesecake.

How to Make Cheesecake Fruit Roll-Ups
Getting these ready is such a joyful process, truly. You start by whipping the cream cheese with a touch of sweetness and vanilla until it’s beautifully smooth and cloud-like; I just love how easily it comes together, creating that luscious base.
Next, you’ll spread that dreamy mixture onto soft tortillas, then arrange your vibrant, freshly sliced fruits, creating a colorful little mosaic. As you gently roll them up, you’ll notice the delicate scent of the fruit mingling with the sweet cream cheese, making your kitchen smell absolutely divine, similar to the anticipation you get when making strawberry cheesecake bites.
Once rolled, a quick brush of melted butter and a sprinkle of cinnamon sugar transforms the humble tortilla into something truly special – golden and fragrant after a quick pan-fry or bake. The sizzle and the scent of cinnamon are just intoxicating!
Pro Tips
- Make sure your cream cheese is truly at room temperature before whipping it. This ensures a silky-smooth, lump-free filling that spreads like a dream and doesn’t tear the tortillas.
- Don’t overload your tortillas with too much fruit or filling. While tempting, a thinner layer means easier rolling and less chance of the filling oozing out, making for perfectly neat Cheesecake Fruit Roll-Ups.
- For the best texture, slightly warm your tortillas before assembling. A quick zap in the microwave for 10-15 seconds makes them more pliable and prevents cracking when you roll them up tightly.
- My Secret Trick: After assembling and before the final cinnamon sugar coating, place the rolled tortillas in the fridge for about 15-20 minutes. This firms up the cream cheese slightly, making them much easier to handle and fry without squishing.

How to Store Cheesecake Fruit Roll-Ups
- Refrigerator: Store any leftover roll-ups in an airtight container in the refrigerator for up to 2-3 days.
- Separation for Fresher Fruit: For best results, especially if making ahead, prepare the cream cheese mixture and cut the fruit, storing them separately. Assemble just before serving.
- No Freezing: I really don’t recommend freezing these; the fruit and cream cheese texture can become watery and undesirable after thawing.
- Serving Temperature: These are best enjoyed chilled or at room temperature, straight from the fridge.
Nutritional Benefits
Beyond being absolutely delicious, these Cheesecake Fruit Roll-Ups offer some lovely nutritional perks too! You’re getting a good dose of vitamins and fiber from all that beautiful fresh fruit, whether it’s berries, kiwi, or melon. Plus, the cream cheese adds a bit of calcium and protein, making this a more satisfying treat than just plain sweets.

FAQs
Can I use different fruits in these roll-ups?
Absolutely! I love to experiment with whatever fruit is in season. Berries, sliced peaches, mango, or even thinly sliced bananas work wonderfully. Just make sure the fruit is not too watery, as it can make the roll-ups soggy. Freshness is key!
Can I make the cheesecake filling ahead of time?
Yes, you certainly can! I often whip up the cream cheese filling a day or two in advance and keep it stored in an airtight container in the refrigerator. This makes assembly super quick when I’m ready for a sweet treat.
What kind of tortillas work best for this recipe?
I find that soft, flour tortillas work best here. Look for ones that are about 8-10 inches in diameter, as they give you enough surface area to spread the filling and fruit, and are pliable enough to roll without tearing. Corn tortillas aren’t quite right for these Cheesecake Fruit Roll-Ups.
How do I prevent the roll-ups from becoming soggy?
The best way to avoid sogginess is to use fresh, firm fruit that isn’t overly ripe or watery. Also, try to serve them within a few hours of assembly, especially if your fruit is prone to releasing a lot of moisture. A light patting of sliced fruit with a paper towel can also help.
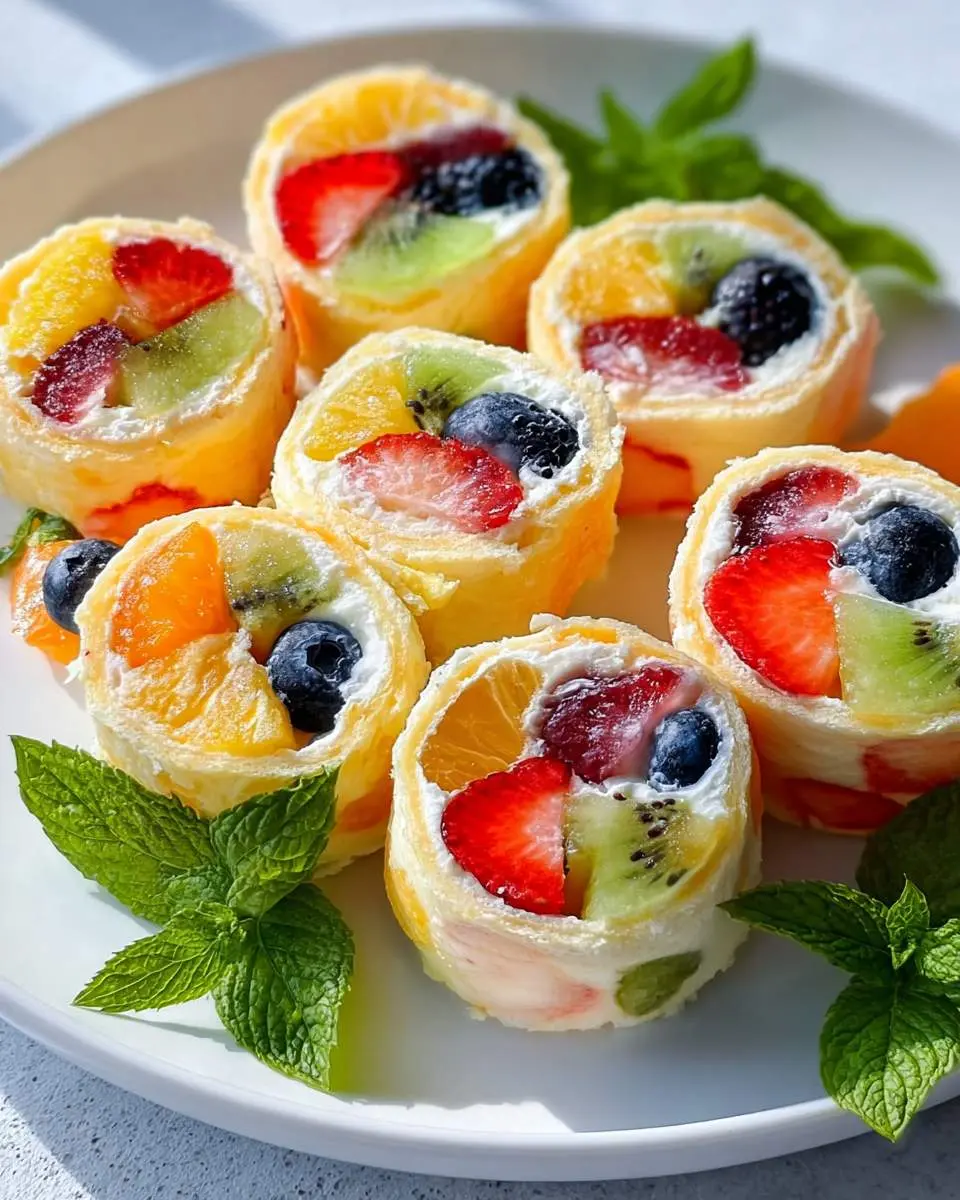

Cheesecake Fruit Roll-Ups
Ingredients
Equipment
Method
- In a medium mixing bowl, combine the softened cream cheese, powdered sugar, vanilla extract, lemon zest, and salt. Beat with an electric mixer on medium speed (or whisk vigorously by hand) until the mixture is completely smooth and creamy, with no lumps.
- Gently fold the finely diced fresh berries into the cheesecake mixture using a spatula. Be careful not to overmix, as this can crush the berries and make the filling watery.
- Lay a spring roll wrapper on a clean, dry surface with one corner pointing towards you (like a diamond). Keep any unused wrappers covered with a damp cloth to prevent them from drying out. Spoon about 2 tablespoons of the cheesecake-berry filling onto the lower third of the wrapper.
- Fold the bottom corner of the wrapper tightly over the filling. Then, fold in the left and right side corners towards the center. Roll the wrapper tightly from the bottom up to create a neat, compact roll. Repeat with the remaining wrappers and filling.
- Preheat your oven to 375°F (190°C). Line a baking sheet with parchment paper. Brush each assembled roll-up lightly with melted butter on all sides. Place the roll-ups seam-side down on the prepared baking sheet, ensuring they are not touching. Bake for 15-20 minutes, or until they are golden brown and crispy.
- Allow the baked roll-ups to cool for a few minutes on the baking sheet before transferring to a serving plate. For an extra touch, dust lightly with powdered sugar before serving. Enjoy warm!
Notes
Fruit Variations: Feel free to get creative with your fruit! Diced peaches, thinly sliced apples with a pinch of cinnamon, or even bananas work wonderfully in place of or in addition to berries.
Crispiness Factor: For the crispiest roll-ups, make sure not to overcrowd your baking sheet or air fryer. Give them enough space so the hot air can circulate evenly around each roll-up.
Conclusion
Honestly, these Cheesecake Fruit Roll-Ups have become such a bright spot in my recipe rotation. They’re just so effortlessly charming and incredibly delicious, hitting all the right notes for a quick snack or a fun dessert. I truly hope you give them a try and discover the simple joy they bring, perhaps even alongside a fantastic strawberry shortcake cheesecake!