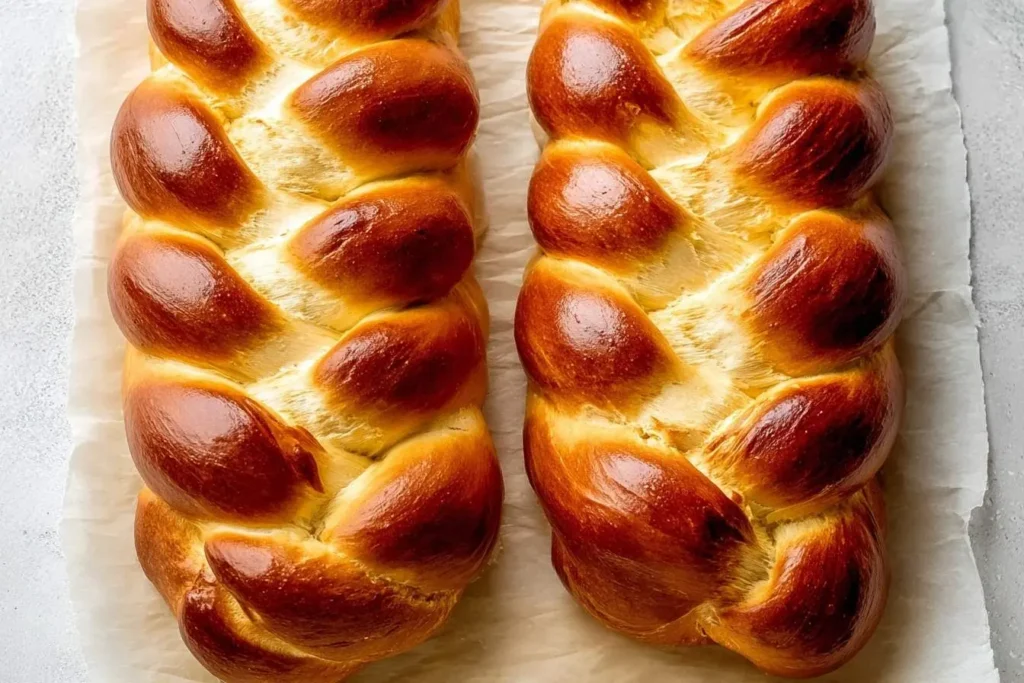
Growing up, the smell of freshly baked bread was always a sign of warmth and togetherness in my home. And among all the wonderful bread recipes I’ve come to cherish, there’s something truly magical about a perfectly braided Challah Bread. Its rich, eggy dough and golden crust always bring a smile to my face, reminiscent of the delicious aromas wafting from my grandmother’s kitchen, much like the comfort found in a soft, pillowy piece of Naan Bread.
I remember experimenting with different flours and techniques on lazy Sunday afternoons, often with flour dusting my apron and a sense of eager anticipation. Baking was, and still is, my favorite way to connect with those cherished memories.
This Challah Bread isn’t just a recipe; it’s an experience. It’s incredibly comforting, and despite its impressive look, it’s surprisingly low-stress to make. My tip? Don’t rush the rises; patience is your secret ingredient for that incredible texture!
What You Need to Make This Recipe
For this golden delight, we’re talking about simple, wholesome ingredients that come together to create something truly special. I love how just a few pantry staples, much like a good 3-ingredient artisan bread, can transform into this rich, eggy Challah Bread. The blend of active dry yeast, a touch of honey, and fresh eggs gives it that signature tenderness and subtle sweetness. You’ll find the full list of ingredients and precise measurements in the recipe card below.

How to Make Challah Bread
Making this beautiful Challah Bread is a truly rewarding process. It begins with activating the yeast, then preparing the rich dough. After a gentle first rise, you get to experience the joy of shaping the distinctive braid – it’s easier than you think! Then, it’s time for the second rise before baking it to a gorgeous golden perfection, much like the satisfaction of baking a rustic Italian Bread.
Pro Tips for Making This Challah Bread
Over the years, I’ve learned a few tricks that consistently ensure my Challah Bread turns out beautifully every time. Here are my go-to tips for a loaf that’s both stunning and incredibly delicious.
- Don’t Overflour: When kneading, resist the urge to add too much extra flour. A slightly sticky dough is a happy dough for Challah Bread, leading to a much softer final product.
- My Secret Trick: I always brush my finished Challah Bread with an egg wash not once, but twice during the baking process—once before the second rise and again about 15 minutes into baking. This ensures that gorgeous, deep golden-brown crust.
- Patience is Key: Allow your dough to complete both rises fully. Rushing this process will result in dense bread. Look for a doubled size and a light, airy feel.
- Braid Loosely: When braiding, keep your hands light and the braids somewhat loose. The dough will expand during baking, and a tight braid can make it tough.

How to Store Challah Bread
If you happen to have any of this delightful Challah Bread left over (a rare occurrence in my house!), storing it properly ensures its freshness. I usually wrap it tightly in plastic wrap or place it in an airtight container at room temperature for up to 2-3 days. For longer storage, you can slice it and freeze it for up to a month. My personal tip for reheating is to lightly toast individual slices or warm the whole loaf in a low oven; it truly brings back that fresh-baked aroma and soft texture.
Nutritional Benefits
This Challah Bread, while indulgent, provides a good source of carbohydrates for energy, along with some protein from the eggs and a touch of fiber from the flour. It’s a wholesome addition to any family meal, especially when made with love in your own kitchen.
FAQs
Can I make Challah Bread ahead of time for a special occasion?
Absolutely! You can prepare the dough for Challah Bread and let it complete its first rise in the refrigerator overnight. Just be sure to bring it to room temperature for about an hour before shaping and continuing with the second rise and baking.
What’s the best way to get a perfectly golden crust on my Challah Bread?
For that beautiful, shiny, golden crust, an egg wash is essential. I use one large egg beaten with a tablespoon of water and brush it generously over the entire surface of the Challah Bread before the second rise.
Why is my Challah Bread dense?
A dense Challah Bread can often be attributed to not allowing the dough to rise enough during either of the two proofing stages. Make sure your yeast is active and that your dough doubles in size for both rises. Over-kneading can also lead to a tough loaf.
Can I add different flavorings to my Challah Bread?
Yes, you can! While I love the classic flavor, feel free to experiment. Some enjoy adding a touch of orange zest, vanilla extract, or even a sprinkle of cinnamon and raisins to their Challah Bread dough for a unique twist.

Golden Braided Challah Bread
Ingredients
Equipment
Method
- In a large mixing bowl (or stand mixer bowl), combine warm water (105-115°F / 40-46°C), 1 tablespoon of the granulated sugar, and active dry yeast. Stir gently and let sit for 5-10 minutes until foamy. This indicates the yeast is active.
- To the foamy yeast mixture, add the remaining granulated sugar, 2 large eggs + 1 egg yolk (reserving 1 large egg for egg wash later), vegetable oil, and honey. Whisk until well combined.
- Gradually add 3 cups of all-purpose flour and the salt to the wet ingredients. Mix on low speed with a dough hook (or with a wooden spoon) until just combined.
- Continue adding the remaining flour, 1/2 cup at a time, until a shaggy dough forms and pulls away from the sides of the bowl. The dough should be soft and slightly sticky, but not overly wet. Knead with the dough hook for 8-10 minutes on medium-low speed, or by hand on a lightly floured surface for 10-15 minutes, until the dough is smooth, elastic, and passes the windowpane test (you can stretch a small piece thin enough to see light through it without tearing).
- Lightly grease a clean large bowl with a little oil. Transfer the dough to the bowl, turning it once to coat. Cover the bowl tightly with plastic wrap or a clean kitchen towel. Let the dough rise in a warm, draft-free place for 1.5 to 2 hours, or until doubled in size.
- Gently punch down the risen dough to release air. Transfer it to a lightly floured surface. Divide the dough into two equal portions for two loaves. For each loaf, decide on your preferred braid (e.g., 3-strand, 4-strand, or 6-strand).
- For a 6-strand braid (recommended for classic Challah look): Divide one portion of dough into 6 equal pieces. Roll each piece into a long, even rope, about 16-18 inches long. Pinch the tops of the six ropes together firmly. Arrange the ropes in a specific pattern (e.g., three on the left, three on the right). Follow a braiding technique (e.g., from right to left: 6 over 3, 2 over 5, 4 over 1, then repeat). Pinch the ends firmly to seal.
- For a 3-strand braid: Divide one portion of dough into 3 equal pieces. Roll each piece into a long rope. Braid them like a regular hair braid. Pinch the ends firmly to seal.
- Carefully transfer each braided loaf to a baking sheet lined with parchment paper. Cover loosely with a clean kitchen towel or plastic wrap. Let rise in a warm place for another 45-60 minutes, or until visibly puffy.
- About 20 minutes before baking, preheat your oven to 350°F (175°C). In a small bowl, whisk the remaining large egg with 1 tablespoon of water until well combined. This is your egg wash.
- Gently brush the risen challah loaves generously with the egg wash. If desired, sprinkle with sesame or poppy seeds.
- Bake for 30-35 minutes, or until the challah is deep golden brown and sounds hollow when tapped on the bottom. If the challah is browning too quickly, you can loosely tent it with aluminum foil for the last 10-15 minutes.
- Transfer the baked challah loaves to a wire rack to cool completely before slicing and serving.
Notes
Variations: For a sweeter challah, increase the sugar to 3/4 cup. For a richer flavor, you can substitute some of the water with milk. Add a teaspoon of vanilla extract or orange blossom water for a fragrant twist.
Windowpane Test: To perform the windowpane test, tear off a small piece of dough (about the size of a golf ball). Slowly stretch it between your fingers. If you can stretch it thin enough to see light through it without it tearing, your dough is sufficiently kneaded.
Conclusion
Baking this Challah Bread is more than just following a recipe; it’s about creating moments, sharing warmth, and enjoying the simple pleasure of homemade goodness. I hope you’ll try your hand at this rich, eggy delight, much like the satisfaction found in a crusty French Bread. It’s a wonderful way to bring comfort and a touch of tradition to your table, proving that even busy families can enjoy truly amazing baked goods.